|
|
Post by 83trekker on May 4, 2015 19:28:19 GMT -8
Thanks for the update keep them coming.
|
|
|
|
Post by Slacker on May 5, 2015 17:20:02 GMT -8
I was going to make my top removable , but because of my interior , I decided not to ..
but I was going to use the "D" gasket I have on my site for the cab to topper seal , as the main seal for the removable top .. I have used this on just regular canopies , instead of the canopy tape the industry sells .. I have had GREAT success with this product .. and am positive it would work . I was also going to make my top "boltable" .. check out nutcerts , or time certs .. you could also use well nuts
|
|
2many
Junior Member

Posts: 54 
|
Post by 2many on Sept 6, 2015 10:44:59 GMT -8
|
|
|
|
Post by 83trekker on Sept 6, 2015 13:53:00 GMT -8
Very nice more pics of everything!
|
|
|
|
Post by Slacker on Sept 6, 2015 15:42:54 GMT -8
very nice ...
|
|
2many
Junior Member
Posts: 54
|
Post by 2many on Oct 25, 2015 16:55:39 GMT -8
|
|
|
|
Post by Slacker on Oct 26, 2015 15:54:28 GMT -8
lookin' great man !!
|
|
2many
Junior Member
Posts: 54
|
Post by 2many on Feb 18, 2016 9:43:21 GMT -8
Just checking in guys. Not much progress unfortunately. I did get the canopy painted, inside lined, and back in my hands. The rear outer tub portion is STILL off at the body guy getting fixed up. Can't do much "putting together" as I want to have that on before I get the inner tub Rhinolined. Playing the waiting game but I'll keep you posted. Hope all is well!
|
|
|
|
Post by 83trekker on Feb 18, 2016 10:10:50 GMT -8
Good to see you back, thought we lost we lol, post pics when you have some.
|
|
|
|
Post by Slacker on Feb 18, 2016 18:11:07 GMT -8
I hope there doing more then just filling over the cracks ?
|
|
2many
Junior Member
Posts: 54
|
Post by 2many on Apr 11, 2016 19:25:43 GMT -8
No progress on my side but the body guy is saying it should be "all done" on the 22nd. Put in an order with Corey so hopefully stuff will be here in time. So typical, drags out for over a year and then needs it now! I'll be sure to get more pics posted when I have them, lower tub is looking great. Oh, and yes, he has been drilling out and properly filling / patching any cracks. Thanks Corey!
|
|
|
|
Post by Slacker on Apr 12, 2016 16:58:54 GMT -8
cant wait to see the finished product
|
|
2many
Junior Member
Posts: 54
|
Post by 2many on Oct 10, 2016 14:32:41 GMT -8
Hey everybody! OK, I'll admit it - I got side tracked. Being that the bodywork was taking so long I started up on another project that had been sitting on the back burner. Took a 1968 Kaiser Jeep M715 and swapped a 7.3 Ford turbo Diesel, 5 speed, 46" tires and other fun stuff into it. Thought I'd share a pic of this monster:  So anyway, now it's back to the Trekker project. I'll get a current state of affairs in order and get posting again. Hope to get it completed over the coming Winter. Be posting again soon! |
|
|
|
Post by Slacker on Oct 10, 2016 16:12:09 GMT -8
cool
|
|
2many
Junior Member
Posts: 54
|
Post by 2many on Nov 6, 2016 18:44:48 GMT -8
OK, some good news and bad news. We'll hit the good: I got the outer skin reattached with decent results. For those unaware, that is not an easy job for one person! Trying to get everything set in place, lined up, and clamped as the adhesive (went with the Sikaflex Corey recommends - good stuff!) races you to finish can be a bit much! But I got 'er done and then hauled it off to get lined. Here are the pics and then I'll share my frustration: 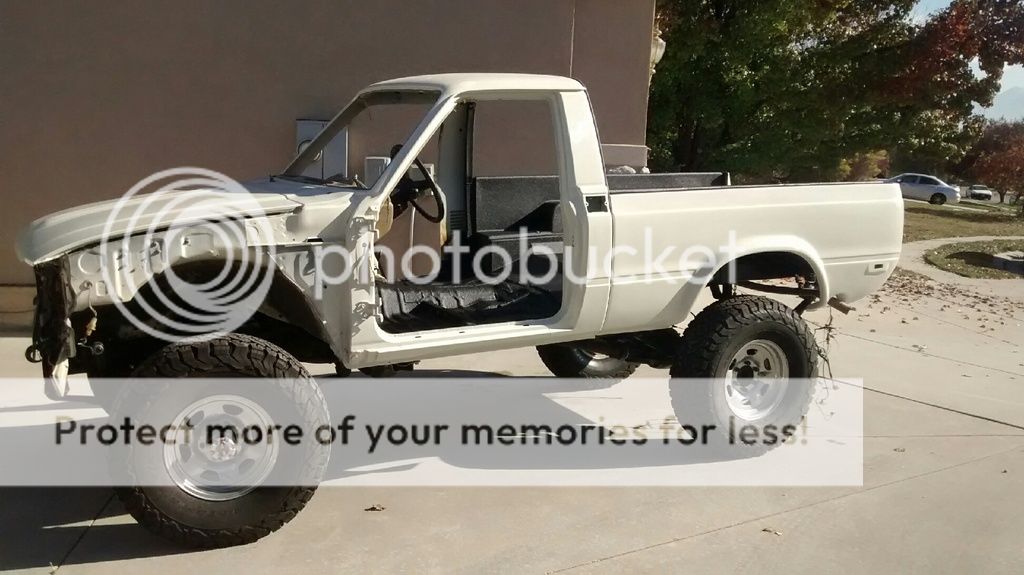  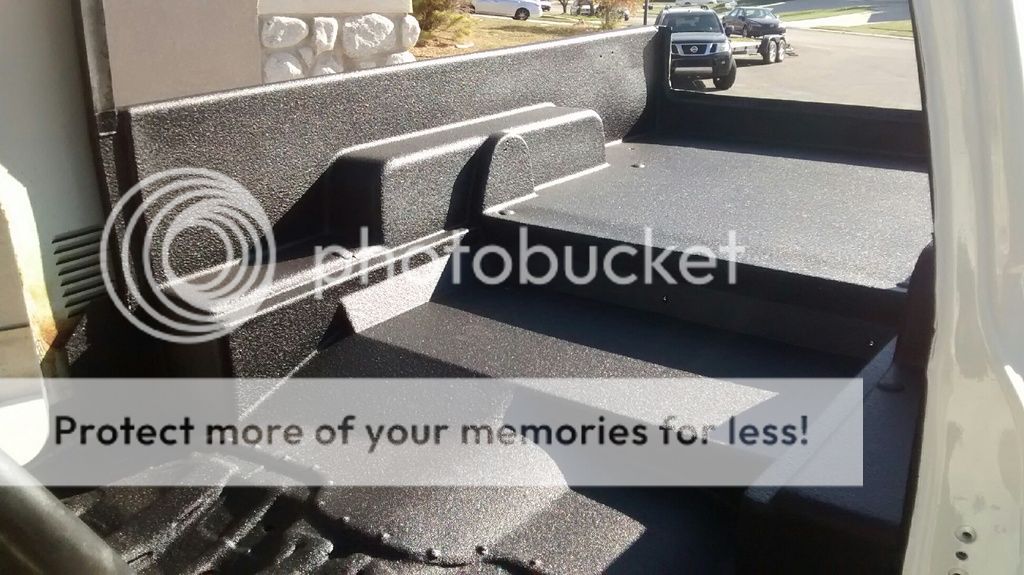 Honestly, the results look even better in person. I'm really excited to be back at a "reassembly" stage and this will give some additional strength and keep that floor in check. I am going with a removable canopy plan so this will also be helpful if rain does get in. Now for what I'm pissed about... So I went to move the Trekker back into the garage after letting it sit for too long. It was late after work and I had removed the battery so had to put it in real quick to fire it up. Not thinking (or remembering) anything odd, I hook the positive post to the red cable and the negative to the black post. Normal deal, right? WRONG. I forgot the nitwit previous owner had replaced the ground with a red cable and the black for the positive. It was dark, I was in a hurry (ever hear the 'haste makes waste' motto?), and didn't look closely. So there were sparks, I pulled the cable off thought 'that was odd but maybe just some normal drain' and tried to hook it up again. More spark show and I figure I better check this out. Grab a flashlight and I realize what's up and my gut sinks. Luckily, it runs and drives fine still and a lot of the dash electrics had already been removed but my gauge panel appears dead. Checked the fuses and they are fine (surprisingly) but the panel's got nothing happening. Anyone ever do this before? Any ideas where to look? Maybe a fuse or link that I'm missing? Anyone have a '81 Toyota wiring diagram to help with? Other areas that might have been affected? Any and all advice appreciated. Glad to be back at this project! |
|


