|
|
Post by gotmyyotaback on Jan 24, 2010 11:10:56 GMT -8
glad those diagrams could help since you are going to do new spring bolts why not just replace the spring bushings on both ends of the springs?..burn the old ones out instead of trying to get that sleave out I remember doing that job on my old '84...what a PITA and still ended up trashing the bushings.. totally forgot that this was Paul's old Trekker...I was hoping he would be stuck with it for another year or so when I could buy it..Glad it went to a good home! The bolt/bushing issue- is that late model springs have a larger outer diameter bushing, with the small hole, if you burn them out you will have a hell of a time finding new ones. So if your doing rears up front, I would suggest using 1st Gen rear springs. The all ready have 18mm holes and standard OD bushings. They are in now. ;D  Fenders cut too!  These are the new old rears vs. the old fts, the old ones were inverted on the truck. New rears have 3 mains, 1 extra from other set, and 1 beefy bottom spring from a lifted spring pack. I have no idea how tall it will be.  |
|
|
|
Post by gotmyyotaback on Feb 2, 2010 17:13:30 GMT -8
Okay, took some time off today to build 2 diffs w/ 529's got to the shop and the install kits didnt show So I took the dau off for nuthin. Decided to do some of the clean up work that I had planned for Tyler for Saturday, I guess he gets lucky again. I also got all the gussets in and the upper truss, cleaned off ll the old bracket slagg, and painted the housing. Some welds I am proud of others are well, They all look worse in the pictures then in real life I did save the other knuckle for Tyler to do, so he can "appreciate" 30 years of grime.    |
|
|
|
Post by gotmyyotaback on Feb 2, 2010 17:16:41 GMT -8
 Made some progress this weekend. Tyler and I went to the shop to assemble the axle, expecting the 3rd to be done, it wasnt they were slammed, so we loaded everything up and went to Royce's to get some help setting it up. Didnt get home til late Sat. So bright and early Sunday we assembled, and eventually hung the sucka!  Forward/Power  reverse/coast  |
|
|
|
Post by gotmyyotaback on Feb 2, 2010 17:19:50 GMT -8
|
|
|
|
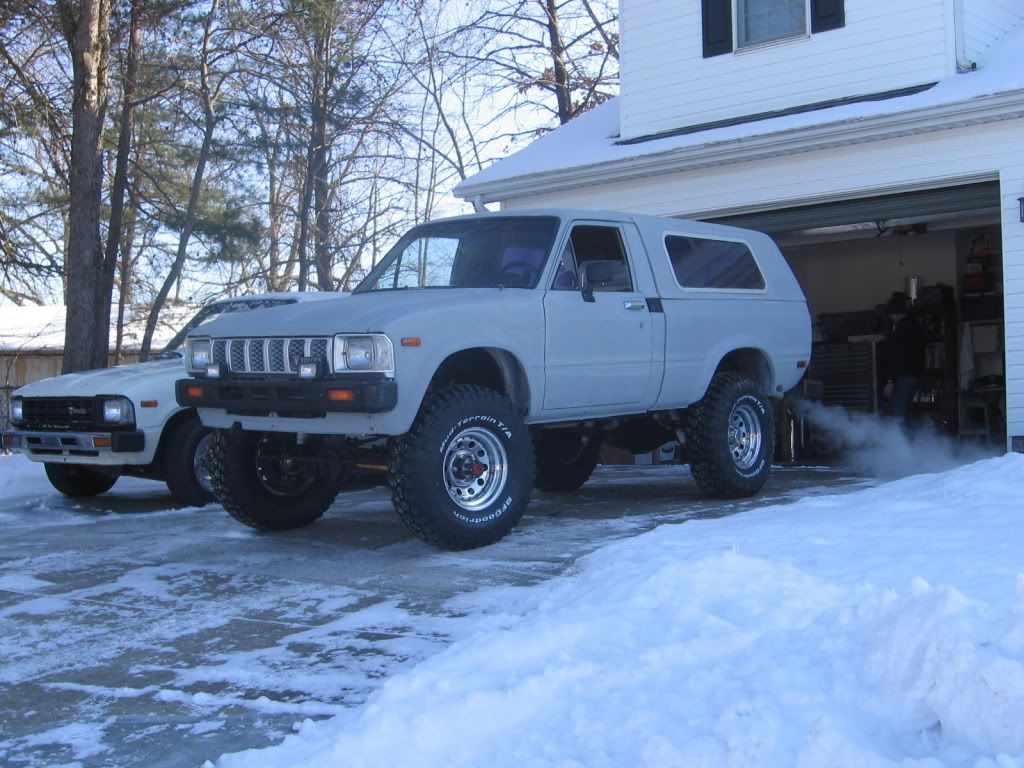
Post by gotmyyotaback on Feb 2, 2010 17:25:25 GMT -8
More....New Ride height!  I didnt even check to see if ft shaft is a CV? I suppose this wont be a problem, with duals and new cross member  Front Shackle angle, I have the front spring hanger "tacked" in place and we put it about 1" further then flush with radiator support, I may be moving it back We will wait til' the rear is self supported and make sure we know what the true stance is.  |
|
|
|
Post by Slacker on Feb 2, 2010 17:29:48 GMT -8
Forward/Power reverse/coast you re-adjusted that right ? that will be noisy as your pinion depth is to much .. . |
|
|
|
Post by b4runner on Feb 2, 2010 18:05:44 GMT -8
nice working with your son on a project...looks great.
but I do agree with Corey about the gear pattern
the new stance is nice!
|
|
|
|
Post by gotmyyotaback on Feb 2, 2010 21:34:18 GMT -8
Forward/Power reverse/coast you re-adjusted that right ? that will be noisy as your pinion depth is to much .. . I hadnt planned on it, I know its not ideal. I got stuck doing it myself, after many attempts this was the best I could get. I figure its a front and wont see any high speed use. Its getting an ARB and one more chrome moly inner axle, before it gets any major use. I suppose I could try again then.  |
|
|
|
Post by gotmyyotaback on Feb 2, 2010 21:36:29 GMT -8
If you were going to do it, what size/how much shim would you take out?
|
|
|
|
Post by Slacker on Feb 3, 2010 7:27:14 GMT -8
good thing , is if you are going to install an ARB .. you will have to take it apart anyway , to install the new case .
are you using the crush sleeve or solid spacer with shims ?
what I recommed is the solid spacer and shims ... makes it way easier to set up .. you'll also have to set up your side bearings to "center" the crown as well ... so just take your time
.
|
|
|
|
Post by Gov't Mule on Feb 3, 2010 18:41:54 GMT -8
If you were going to do it, what size/how much shim would you take out? I too agree with Corey and Robb, that looks way deep. I just set my diffs up last month...there are some pics in my thread here (Project Sherpa). If I were you, I'd pull about ten thousandths out of your pinion shim pack and check the pattern again. And make sure you ring gear is centered up with .008" backlash. Here's a good website for setting up a Toy diff if you want some good reference: gearinstalls.com/That gusset and truss work on the front axle housing looks good, but it looks as though some of those beads are very long and continuous. Please tell me that you welded that up in short (non continuous)sections...otherwise you may have caused some warping to the housing. I've seen guys do that job with the weight of the truck on the axle and make too long of a welding pass and warp the housing so bad that the inner axle seals will never seal again. That's a great lookin Trekker...AWESOME that you are workin as a team with your son. Good luck to both of you!!! |
|
|
|
Post by gotmyyotaback on Feb 4, 2010 9:07:16 GMT -8
good thing , is if you are going to install an ARB .. you will have to take it apart anyway , to install the new case . are you using the crush sleeve or solid spacer with shims ? what I recommed is the solid spacer and shims ... makes it way easier to set up .. you'll also have to set up your side bearings to "center" the crown as well ... so just take your time . I used the solid sleeve, with shims. I'll have it done by one of my guys, next month, when im in there again. Its not being used before then. |
|
|
|
Post by gotmyyotaback on Feb 4, 2010 9:10:34 GMT -8
If you were going to do it, what size/how much shim would you take out? I too agree with Corey and Robb, that looks way deep. I just set my diffs up last month...there are some pics in my thread here (Project Sherpa). If I were you, I'd pull about ten thousandths out of your pinion shim pack and check the pattern again. And make sure you ring gear is centered up with .008" backlash. Here's a good website for setting up a Toy diff if you want some good reference: gearinstalls.com/That gusset and truss work on the front axle housing looks good, but it looks as though some of those beads are very long and continuous. Please tell me that you welded that up in short (non continuous)sections...otherwise you may have caused some warping to the housing. I've seen guys do that job with the weight of the truck on the axle and make too long of a welding pass and warp the housing so bad that the inner axle seals will never seal again. That's a great lookin Trekker...AWESOME that you are workin as a team with your son. Good luck to both of you!!! This isnt a back lash issue, its pinion depth. I set it at 2 to 14 and ended at 6, no change in the power pattern. No weld was more then about 2.5" and I moved all over the housing to distribute the heat. Not my 1st welding rodeo ;D. |
|
|
|
Post by Gov't Mule on Feb 4, 2010 12:24:01 GMT -8
:)I realize that it's a pinion depth issue...that's why I said you should start by taking about .010 out of your pinion shim pack and check the pattern again.
I don't understand what you mean when you say you set it at 2 to 14 and ended at 6?? are you referring to backlash?? also, did you preload those ring gear carrier bearings any? 15 in/lb is what's recommended for new carrier bearings and 15-20 in/lb for the pinion bearings.
|
|
|
|
Post by gotmyyotaback on Feb 6, 2010 8:28:50 GMT -8
:)I realize that it's a pinion depth issue...that's why I said you should start by taking about .010 out of your pinion shim pack and check the pattern again. I don't understand what you mean when you say you set it at 2 to 14 and ended at 6?? are you referring to backlash?? also, did you preload those ring gear carrier bearings any? 15 in/lb is what's recommended for new carrier bearings and 15-20 in/lb for the pinion bearings. Yea, I was refering to backlash. I think a better plan will be to give it to my employee who just did the rear, it looks good. Ikk take a picture later. Had to gring the pinion to keep it from touching the carrier. I guess thats kinda common on 529's, and he used the crush sleave not the cast one. |
|